A “world reveal” shader (a.k.a. “dissolve the world shader” or “global dissolve“) lets you uniformly fade all the objects in your scene based on their distance from a position; today we ll create our one in Unity’s Shader Graph and write it in HLSL.
Here’s an example of what we’ll create:
Since this is the part-2, I highly suggest you to read my previous tutorial about “dissolve shaders“.
PS. Oh hey almost three years ago I released a plugin called “Text Animator for Unity”, a tool I made/needed for my own games - and Today it is also getting used in other games like “Dredge, Cult of The Lamb”, “Slime Rancher 2” and many more!! I’d love if you could check it out! you’d also support me while I work on exciting stuff behind the scenes, so… thank you very much! ✨
Baaack to the article.
How it works
Using Distance as Parameter
Let’s say we want to dissolve an object in our scene if it’s too far from the player. We already declared the “_Amount” parameter which controls the fade/dissolve progress of our object; we just need to replace it with the distance between the object and the player.
To do this we have to get the Player and the Object position.
Retrieving the Player position
The process is the same for both Unity’s Shader Graph and HLSL: we need to pass the player position via code.
private void Update()
{
    //Updates the _PlayerPos variable in all the shaders
    //Be aware that the parameter name has to match the one in your shaders or it wont' work
    Shader.SetGlobalVector("_PlayerPos", transform.position); //"transform" is the transform of the Player
}
Via Shader Graph
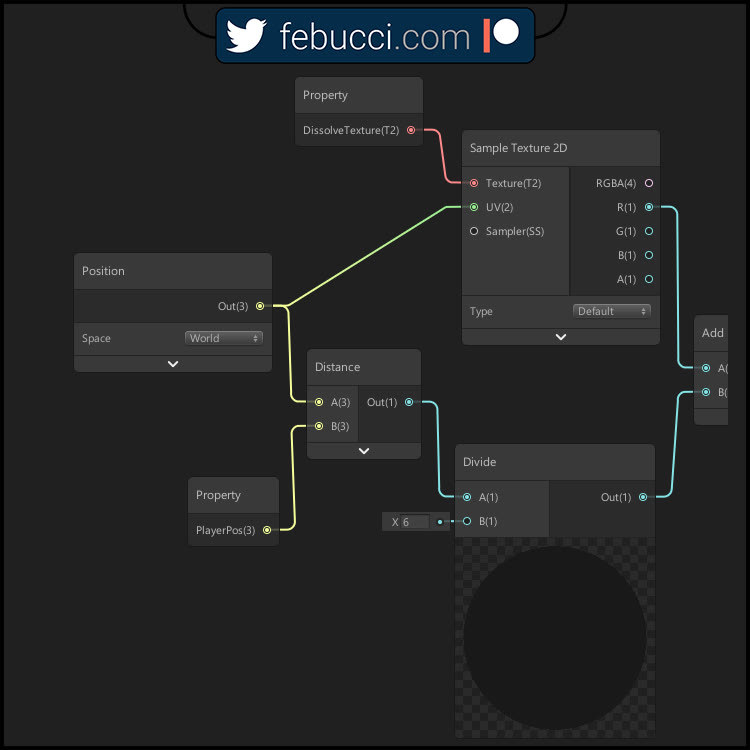
Using Shader Graph you’ll be able to use the Position and Distance nodes.
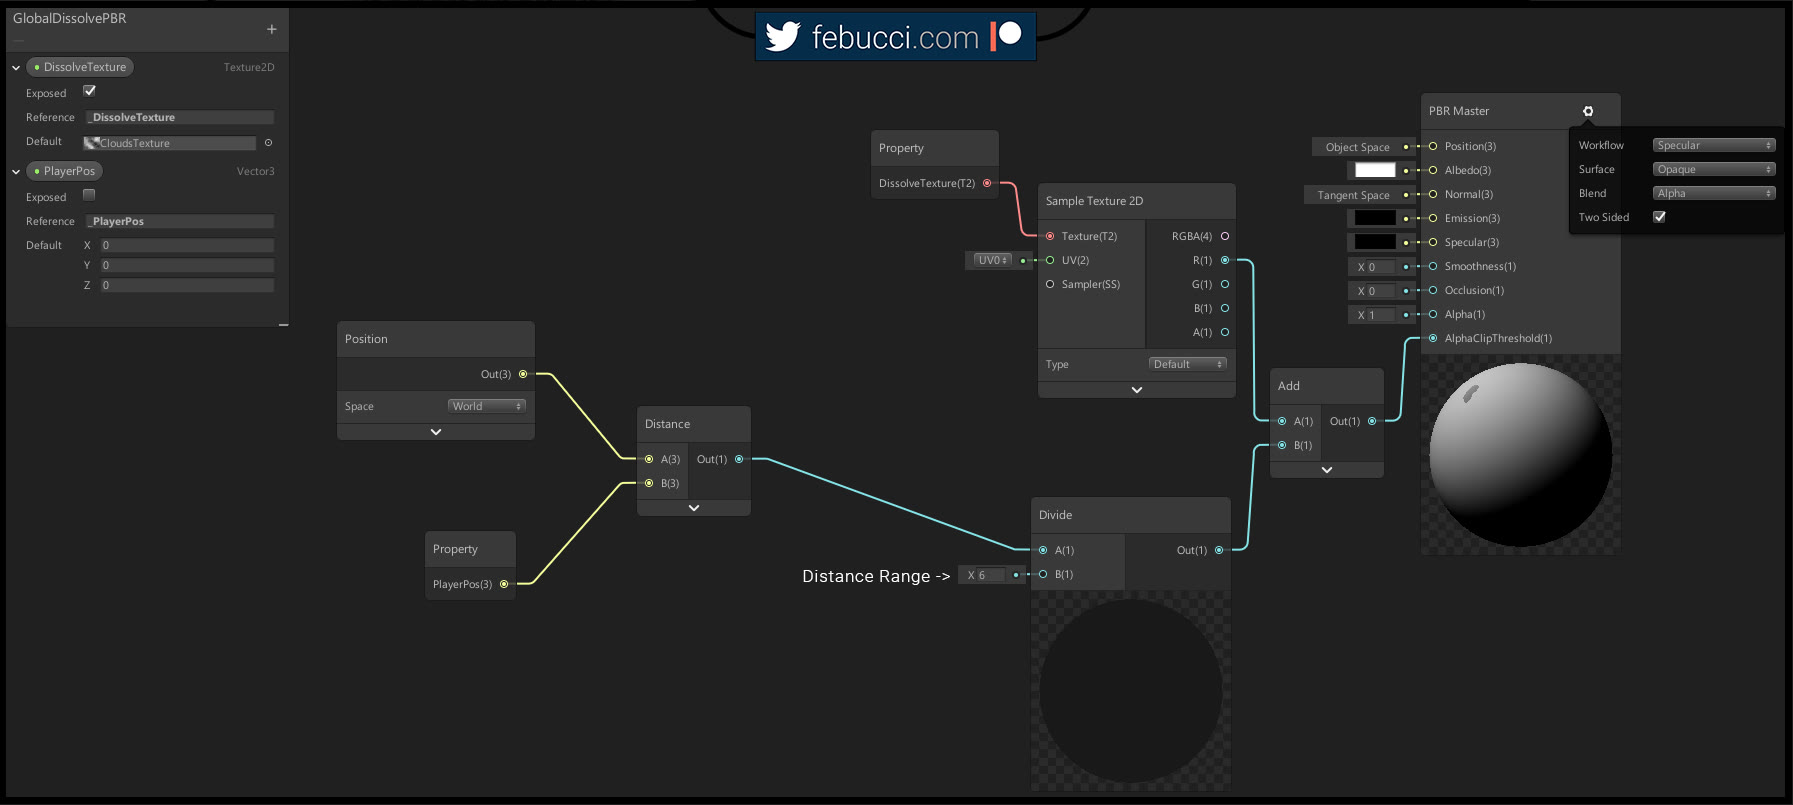
P.s. to make this work with Sprite Renderers you must add the “_MainTex” property, sample it and connect it to the albedo.
You can also read my previous tutorial about Sprites diffuse shader (using shader graph).
Via HLSL (Surface)
Object Position
In HLSL we can add the variable “worldPos” in our Input struct to get the vertex position of our objects.
struct Input
{
	float2 uv_MainTex;
	float3 worldPos; //add this and Unity will set it automatically
}
You can see what other built-in parameters you can add to the Input struct in this Unity’s documentation page.
Apply the distance
We need to use the distance between our objects and our player as the amount of the dissolve. You can use the already built-in distance function (Microsoft documentation here).
 void surf (Input IN, inout SurfaceOutputStandard o) {
	half dissolve_value = tex2D(_DissolveTexture, IN.uv_MainTex).x;

	float dist = distance(_PlayerPos, IN.worldPos);

	clip(dissolve_value - dist/ 6f); //"6" is the maximum distance where your object will start showing

	//Set albedo, alpha, smoothness etc[...]
}
Setting up the shader
For 2D Sprites
Shader "Custom/GlobalDissolveSprites"
{
	Properties
	{
		[PerRendererData] _MainTex("Sprite Texture", 2D) = "white" {}
		_Color("Tint", Color) = (1,1,1,1)
		[MaterialToggle] PixelSnap("Pixel snap", Float) = 0
		[HideInInspector] _RendererColor("RendererColor", Color) = (1,1,1,1)
		[HideInInspector] _Flip("Flip", Vector) = (1,1,1,1)
		[PerRendererData] _AlphaTex("External Alpha", 2D) = "white" {}
		[PerRendererData] _EnableExternalAlpha("Enable External Alpha", Float) = 0


		_DissolveTexture("Dissolve texture", 2D) = "white" {}
		_Radius("Distance", Float) = 1 //distance where we start to reveal the objects
	}

	SubShader
	{
		Tags
		{
			"Queue" = "Transparent"
			"IgnoreProjector" = "True"
			"RenderType" = "Transparent"
			"PreviewType" = "Plane"
			"CanUseSpriteAtlas" = "True"
		}

		Cull Off
		Lighting Off
		ZWrite Off
		Blend One OneMinusSrcAlpha

		CGPROGRAM
		#pragma surface surf Lambert vertex:vert nofog nolightmap nodynlightmap keepalpha noinstancing
		#pragma multi_compile _ PIXELSNAP_ON
		#pragma multi_compile _ ETC1_EXTERNAL_ALPHA
		#include "UnitySprites.cginc"

		struct Input
		{
			float2 uv_MainTex;
			fixed4 color;
			float3 worldPos; //Built-in world position
		};

		sampler2D _DissolveTexture; //texture where we get the dissolve value
		float3 _PlayerPos; //"Global Shader Variable", contains the Player Position
		float _Radius;

		void vert(inout appdata_full v, out Input o)
		{
			v.vertex = UnityFlipSprite(v.vertex, _Flip);

			#if defined(PIXELSNAP_ON)
			v.vertex = UnityPixelSnap(v.vertex);
			#endif

			UNITY_INITIALIZE_OUTPUT(Input, o);
			o.color = v.color * _Color * _RendererColor;
		}

		void surf(Input IN, inout SurfaceOutput o)
		{
			half dissolve_value = tex2D(_DissolveTexture, IN.uv_MainTex).x;
			float dist = distance(_PlayerPos, IN.worldPos);
			clip(dissolve_value - dist / _Radius);

			fixed4 c = SampleSpriteTexture(IN.uv_MainTex) * IN.color;
			o.Albedo = c.rgb * c.a;
			o.Alpha = c.a;
		}

		ENDCG
	}

	Fallback "Transparent/VertexLit"
}
P.S. To create the last shader I copied the default “Sprites-Diffuse” Unity’s shader and added the “dissolve” part previously explained in this tutorial.
You can find all default shaders clicking here.
For 3D Objects
Shader "Custom/GlobalDissolveSurface" {
	Properties {
		_Color ("Color", Color) = (1,1,1,1)
		_MainTex ("Albedo (RGB)", 2D) = "white" {}
		_Glossiness("Smoothness", Range(0,1)) = 0.5
		_Metallic("Metallic", Range(0,1)) = 0.0

		_DissolveTexture("Dissolve texture", 2D) = "white" {}
		_Radius("Distance", Float) = 1 //distance where we start to reveal the objects
	}
		SubShader{
			Tags { "RenderType" = "Opaque" }
			LOD 200
			Cull off //material is two sided

		CGPROGRAM

		#pragma surface surf Standard fullforwardshadows

		#pragma target 3.0

		sampler2D _MainTex;
		sampler2D _DissolveTexture; //texture where we get the dissolve value

		struct Input
		{
			float2 uv_MainTex;
			float3 worldPos; //Built-in world position
		};

		half _Glossiness;
		half _Metallic;
		fixed4 _Color;

		float3 _PlayerPos; //"Global Shader Variable", contains the Player Position
		float _Radius;

		void surf (Input IN, inout SurfaceOutputStandard o) {

			half dissolve_value = tex2D(_DissolveTexture, IN.uv_MainTex).x;

			float dist = distance(_PlayerPos, IN.worldPos);

			clip(dissolve_value - dist/ _Radius);

			fixed4 c = tex2D (_MainTex, IN.uv_MainTex) * _Color;
			o.Albedo = c.rgb;
			o.Metallic = _Metallic;
			o.Smoothness = _Glossiness;
			o.Alpha = c.a;
		}

		ENDCG
	}
	FallBack "Diffuse"
}
As you can see the objects dissolve “locally”, we don’t have a uniform effect because we’re getting the “dissolve value” from the texture sampled with the UV of each object. (This is less noticeable in 2D).
Uniforming the effect
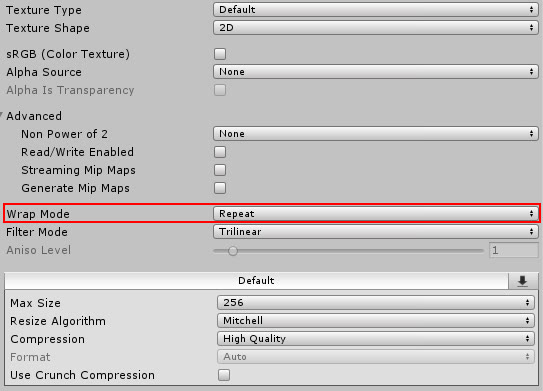
To uniform the effect we can use global coordinates (world position) as the UV of the dissolve texture.
It’s also important to set “Wrap = Repeat” in our dissolve texture settings so we can repeat the texture without noticing it (also, make sure that the texture is seamless/repeats well!)
For 2D Sprites
HLSL
half dissolve_value = tex2D(_DissolveTexture, IN.worldPos / 4).x; //I modified the worldPos to reduce the texture size
Shader Graph
That’s the result, you can already see that the dissolve texture is now uniform all around the world.
This shader is already perfect for 2D games but we need to improve it for 3D objects.
For 3D Objects
The Wrapping Iusse
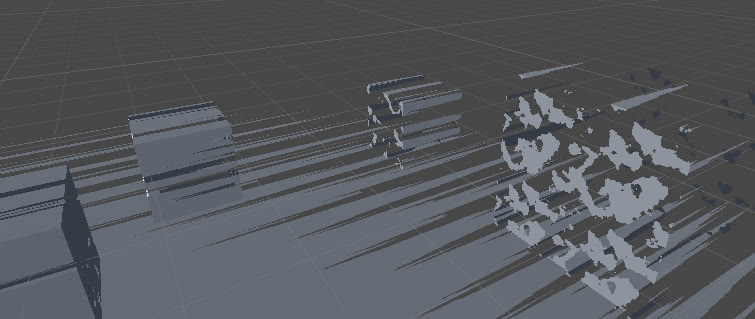
As you can see it doesn’t work for “non vertical” faces, wrapping the texture badly.
That’s because the UV needs a float2 and if we pass our worldPos it only gets the X and Y.
If we fix this issue applying some math to display the texture on all faces we’ll encounter a new problem: the objects intersect with each other while fading, not being uniform.
Noise Solution
The solution is not beginner-friendly, you should remove the texture and generate a 3D Noise in the world and get the “dissolve value” from there.
I won’t cover how to generate a 3D Noise in this post but you can find a lot of ready-to-use noise functions around!
Here’s an example of a noise shader: https://github.com/keijiro/NoiseShader You can also learn how to generate noise here: https://thebookofshaders.com/11/ and here https://catlikecoding.com/unity/tutorials/noise/
I set my surface function this way (assuming that you already have written the noise part):
void surf (Input IN, inout SurfaceOutputStandard o) {

	float dist = distance(_PlayerPos, IN.worldPos);

	//"abs" because you have to make sure that the noise is between the range [0,1]
	//you can remove "abs" if your noise function returns a value between [0,1]
        //also, replace "NOISE_FUNCTION_HERE" with your 3D noise function.
	half dissolve_value = abs(NOISE_FUNCTION_HERE(IN.worldPos));

	float clip_value = (dissolve_value - (dist - _Radius) / _Radius) * step( _Radius , dist ) ;
	clip(clip_value);

	o.Emission = float3(1, 1, 1) * step( clip_value , 0.05f ) * step(_Radius, dist);


	fixed4 c = tex2D (_MainTex, IN.uv_MainTex) * _Color;
	o.Albedo = c.rgb;
	o.Metallic = _Metallic;
	o.Smoothness = _Glossiness;
	o.Alpha = c.a;
}
Quick reminder for HLSL: you need to write/declare every function before you use/call it.
P.S. If you want to create this using Unity’s Shader Graph, you should use Custom Nodes (and generate the noise writing the HLSL code in them). I’ll talk about Custom Nodes in a future tutorial.
Adding Outlines
To add outlines you can follow the process on my previous Dissolve Shader tutorial.
Inverting the effect
What if we want to inverse the effect? (Objects disappear if the player is near). You only need to change one line:
float dist = _Radius - distance(_PlayerPos, IN.worldPos);
The same process goes for Shader Graph.